
Tutorial - writing a blog
Please notice! This tutorial is valid for versions of Jeff previous than v0.99, check out new version tutorials for the latest releases.
In this tutorial you will see step by step how-to write a simple weblog module with Jeff php framework.
Here we assume we're developing in a LAMP environment.
Create the db tables
Jeff is designed for a database driven programming experience, so writing our data tables is the first thing. For a blog application we need at least two tables, one for the categories and one for the entries (post). So first of all we create these two tables:
	-- -- Table structure for table `blog_category` --


	CREATE TABLE IF NOT EXISTS `blog_category` (


	  `id` int(3) NOT NULL AUTO_INCREMENT,


	  `name` varchar(64) NOT NULL,


	  `description` text,


	  PRIMARY KEY (`id`)


	) ENGINE=MyISAM DEFAULT CHARSET=utf8 AUTO_INCREMENT=1 ;


	-- -- Table structure for table `blog_post` --


	CREATE TABLE IF NOT EXISTS `blog_post` (


	  `id` int(8) NOT NULL AUTO_INCREMENT,


	  `date` datetime NOT NULL,


	  `category` int(3) NOT NULL,


	  `slug` varchar(128) NOT NULL,


	  `title` varchar(128) NOT NULL,


	  `subtitle` varchar(128),


	  `text` text NOT NULL,


	  `image` varchar(64) DEFAULT NULL,


	  PRIMARY KEY (`id`)


	) ENGINE=MyISAM DEFAULT CHARSET=utf8 AUTO_INCREMENT=1 ;
Also probably we want to assign the privileges to manage the blog backoffice only to some users, so we create a new privilege record that we will use later:
	INSERT INTO `sys_privileges` ( `category` , `class` , `class_id` , `label` , `description` )


	VALUES ( 'Blog', 'blog', '1', 'Blog management', 'Insertion, modification and deletion of blog categories and entries' );
In this tutorial I'll not consider user comments, but it will be easy to add them after understanding how the creation of this module works.
Create the needed files
To manage our db data we need some classes and directories:
- create a folder named blog under the directory modules. It will contains all the module's classes
- create a file named blog.controller.php under this directory. It will be the blog controller.
- create a file named blogPost.php under this directory. It will be the blog post model.
- create a file named blogCategory.php under this directory. It will be the blog category model.
- create a folder blog under the upload directory. It will be the upload directory for post images. Be sure to assign the proper privileges to this folder (755)!
Define the blog tables
Create a file named project_tables.php and put in under the root directory.
Pu the following lines in this file:
	<?php


	/*


	 * blog tables


	 */


	define("TBL_BLOG_CATEGORY", 'blog_category');


	define("TBL_BLOG_POST", 'blog_post');


	?>
Implement the controller for back office purposes
Now we have to write the controller logic, so open the blog.controller.php file and edit it. Each module's controller is an extension of the parent class controller which stays in Jeff core.
	<?php


	// include models


	require_once('blogPost.php');


	require_once('blogCategory.php');


	class blogController extends controller {


	    function __construct($registry) {


	        // construct the parent class


	        parent::__construct($registry);


	        // variables needed by Jeff


	        $this->_cpath = dirname(__FILE__);


	        $this->_mdl_name = "blog";


	        // privileges for backoffice administration


	        $this->_class_privilege = $this->_mdl_name;


	        $this->_admin_privilege = 1;


	    }


	}


	?>
Notice the two lines defining the privileges for back office management, they fit exactly the sql statement executes in the previous step.
Now let's create the back office management for the category table. We create a method named manageCategory and add it to the controller class:
	// blog category backoffice


	public function manageCategory() {


	    // only users with the right privileges may enter!


	    access::check($this->_registry, $this->_class_privilege, $this->_admin_privilege, array("exitOnFailure"=>true));


	    // define html fields (normal text fields do not allow html tag insertion)


	    $html_fields = array("description");


	    // instantiate the adminTable class which creates the backoffice.


	    // charge dojo editor for html fields


	    $at = new adminTable($this->_registry, TBL_BLOG_CATEGORY, array("editor"=>true));


	    $at->setHtmlFields($html_fields);


	    $table = $at->manage();


	    $this->_view->setTpl('manage_table');


	    $this->_view->assign('title', __("ManageTable")." ".TBL_BLOG_CATEGORY);


	    $this->_view->assign('table', $table);


	    return $this->_view->render();


	}
Now to see the result log into your admin area and visit ROOT/admin/blog/manageCategory, you should see something like this:
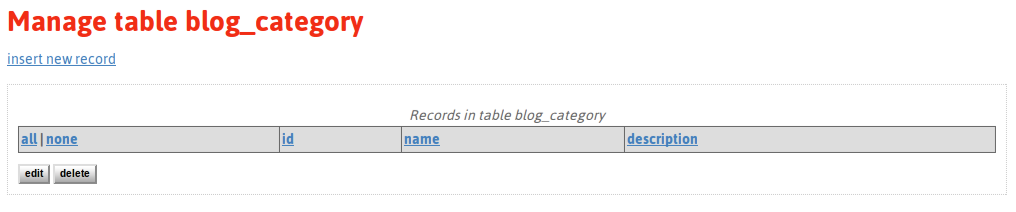
As you can see the blog category table back office is ready. Is already possibly to enter, modify and delete blog categories, we do not need anything more.
Notice the definition of the html fields. They are treated differently from normal string fields as they allows html tag insertion; moreover it is possible to charge a dojo editor instead of a normal textarea.
So now let's implement the blog post back office, create a method manage and add it to the controller class:
	// blog post backoffice


	public function manage() {


	    // only users with the right privileges may enter!


	    access::check($this->_registry, $this->_class_privilege, $this->_admin_privilege, array("exitOnFailure"=>true));


	    // define html fields (normal text fields do not allow html tag insertion)


	    $html_fields = array("text");


	    // define special fields


	    $s_fields = array(


	        "category"=>array(


	            "type"=>"multicheck",


	            "field"=>"name",


	            "value_type"=>'int',


	            "table"=>TBL_BLOG_CATEGORY,


	            "where"=>null,


	            "order"=>null


	        ),


	        "image"=>array(


	            "type"=>"file",


	            "label"=>"image",


	            "path"=>ABS_UPLOAD.DS.'blog',


	            "preview"=>true,


	            "rel_path"=>REL_UPLOAD.'/blog',


	            "extensions"=>array("jpg", "png", "gif")


	        )


	    );


	    // instantiate the adminTable class which creates the backoffice.


	    // charge dojo editor for html fields


	    // view only some fields in the list


	    $at = new adminTable($this->_registry, TBL_BLOG_POST, array("changelist_fields"=>array('category', 'title', 'image', 'date'), "editor"=>true));


	    $at->setSpecialFields($s_fields);


	    $at->setHtmlFields($html_fields);


	    $table = $at->manage();


	    $this->_view->setTpl('manage_table');


	    $this->_view->assign('title', __("ManageTable")." ".TBL_BLOG_POST);


	    $this->_view->assign('table', $table);


	    return $this->_view->render();


	}
Now to see the result log into your admin area and visit ROOT/admin/blog/manage, you should see an empty list with a link for the insertion of new posts, exactly as for the cateogory back office. The auto-generated form for the post insertion looks as follow:
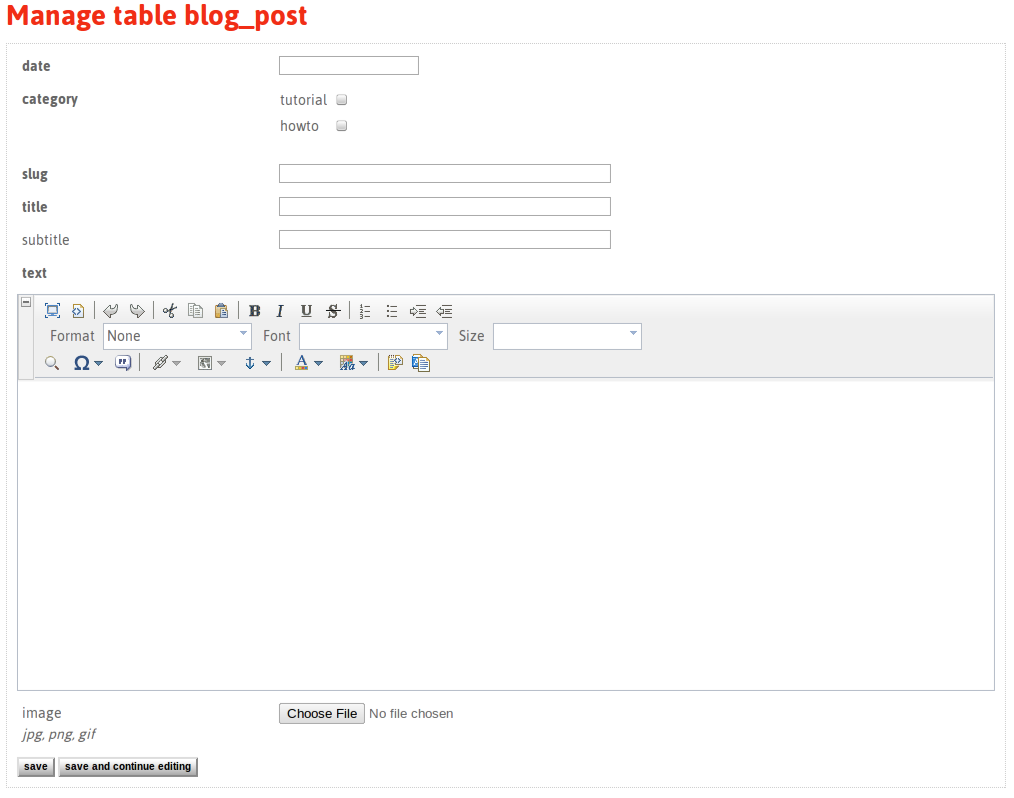
Here we can notice how Jeff treated the special fields we defined in the manage method.
The field category is of type multicheck, so Jeff lists all the registered categories allowing the user to choose some of them.
The image field is of type image, so jeff presents an input file field and manages the upload and all the related stuffs automatically.
Everything here, with a few lines of code we generated a complete back office that allows us to manage categories and post for a simple weblog, beautiful isn't it?
Now we can focus on developing the front end methods, the public views
Developing the front end
Well, what kind of views we'd like to implement for our weblog? Probably in the simplest case we need two different views:
- a paginated list of posts
- the view of a single post (where users may insert comments for examples, i'll not cover the comment issue here)
But to do so, we need the model classes which represents a category and a post, as they are responsible for getting data from the database.
The category model class
Let's open the blogCategory.php file and add this code lines to it:
	<?php


	class blogCategory extends model {


	    function __construct($registry, $id) {


	        $this->_registry = $registry;


	        $this->_tbl_data = TBL_BLOG_CATEGORY;


	        parent::__construct($this->initP($id));


	    }


	    private function initP($id) {


	        // load the fields values as class properties values


	        return $this->initDbProp($id);


	    }


	}


	?>
This is the basic code needed to "activate" the ORM functionality of the model type class. In this way an instance of blogCategory can access any field of the table corresponding to the id that is passed when creating the object.
The post model class
Let's open the blogPost.php file and add this code lines to it:
	<?php


	class blogPost extends model {


	    function __construct($registry, $id) {


	        $this->_registry = $registry;


	        $this->_tbl_data = TBL_BLOG_POST;


	        parent::__construct($this->initP($id));


	    }


	    private function initP($id) {


	        return $this->initDbProp($id);


	    }


	    // get all posts in a date descendant order


	    public static function getAll($registry, $opts=null) {


	        $objs = array();


	        $limit = gOpt($opts, 'limit', null);


	        $rows = $registry->db->autoSelect("id", TBL_BLOG_POST, '', 'date DESC', $limit);


	        foreach($rows as $row)


	            $objs[] = new blogPost($registry, $row['id']);


	        return $objs;


	    }


	    // get a post from its slug value (url purposes, permalinks)


	    public static function getFromSlug($registry, $slug) {


	        $rows = $registry->db->autoSelect(array("id"), TBL_BLOG_POST, "slug='$slug'", null);


	        return count($rows) ? new blogPost($registry, $rows[0]['id']) : null;


	    }


	}


	?>
respect to the class model of the category appear 2 additional methods, which serve to make the queries on the database to retrieve the objects to be used in the two views.
The post list view
First we have to add a method to the blog controller class and then we have to create a view with the html content.
Let's start from the controller method index, add it to the blogController class:
	public function index() {


	    // this is a public content!


	    access::check($this->_registry, 'public_view', null, array("exitOnFailure"=>true));


	    // pagination, 5 items for page


	    $pag = new pagination($this->_registry, 5, $this->_registry->db->getNumRecords(TBL_BLOG_POST));


	    $limit = array($pag->start(), 5);


	    $posts_objs = blogPost::getAll($this->_registry, array("limit"=>$limit));


	    // variable we pass to the view $posts = array();


	    foreach($posts_objs as $p) {


	        // multicheck fields has a comma separated list of ids


	        $ctgs = array();


	        foreach(explode(',', $p->category) as $cid) {


	            $c = new blogCategory($this->_registry, $cid);


	            $ctgs[] = htmlVar($c->name);


	        }


	        $posts[] = array(


	            "date"=>$this->_registry->dtime->view($p->date, "datetime"),


	            // date format for time tag, datetime attribute (html5)


	            "date_tag"=>$this->_registry->dtime->view($p->date, "%Y-%m-%dT%H:%i:%s+01:00"),


	            // link to the single post view


	            "link"=>$this->_router->linkHref($this->_mdl_name, 'view', array('id'=>$p->slug)),


	            "category"=>$ctgs,


	            "title"=>htmlVar($p->title),


	            "subtitle"=>htmlVar($p->subtitle),


	            "text"=>htmlVar($p->text),


	            "image"=>REL_UPLOAD."/blog/".$p->image


	        );


	    }


	    $this->_view->setTpl('blog_index');


	    $this->_view->assign('title', __("Weblog"));


	    $this->_view->assign('posts', $posts);


	    $this->_view->assign('psummary', $pag->summary());


	    $this->_view->assign('pnavigation', $pag->navigation());


	    return $this->_view->render();


	}
Now let's see the view "blog_index", which is a file named blog_index.php that has to be placed inside the view directory of the active theme or the default one: ROOT/themes/deafault/view/blog_index.php
	<section>


	  <h1><?= $title ?></h1>


	  <? foreach($posts as $post): ?>


	    <article>


	      <header>


	        <p>


	          Published on <time datetime="<?= $post['date_tag'] ?>" pubdate><?= $post['date'] ?></time> in


	          <? foreach($post['category'] as $c): ?>


	            <?= $c ?>


	          <? endforeach ?>


	        </p>


	        <hgroup>


	          <h1><a href="<?= $post['link'] ?>"><?= $post['title'] ?></a></h1>


	          <? if($post['subtitle']): ?>


	            <h2><?= $post['subtitle'] ?></h2>


	          <? endif ?>


	        </hgroup>


	      </header>


	      <img width="200px" class="left" style="margin-right: 10px;margin-bottom: 10px;" src="<?= $post['image'] ?>" alt="post_image" />


	      <?= $post['text'] ?>


	      <div class="clear"></div>


	    </article>


	  <? endforeach ?>


	  <div class="left"><?= $psummary ?></div>


	  <div class="right"><?= $pnavigation ?></div>


	  <div class="clear"></div>


	</section>
As you can see it's simple html with inside the php variables assigned in the controller.
The single post view
Similarly for the single post view, the controller method:
	public function view() {


	    // this is a public content!


	    access::check($this->_registry, 'public_view', null, array("exitOnFailure"=>true));


	    // clean get parameter


	    $slug = cleanInput('get', 'id', 'string');


	    $p = blogPost::getFromSlug($this->_registry, $slug);


	    // multicheck fields has a comma separated list of ids


	    $ctgs = array();


	    foreach(explode(',', $p->category) as $cid) {


	        $c = new blogCategory($this->_registry, $cid);


	        $ctgs[] = htmlVar($c->name);


	    }


	    // variable we pass to the view


	    $post = array(


	        "date"=>$this->_registry->dtime->view($p->date, "datetime"),


	        // date format for time tag, datetime attribute (html5)


	        "date_tag"=>$this->_registry->dtime->view($p->date, "%Y-%m-%dT%H:%i:%s+01:00"),


	        "category"=>$ctgs,


	        "title"=>htmlVar($p->title),


	        "subtitle"=>htmlVar($p->subtitle),


	        "text"=>htmlVar($p->text),


	        "image"=>REL_UPLOAD."/blog/".$p->image


	    );


	    $this->_view->setTpl('blog_view');


	    $this->_view->assign('post', $post);


	    return $this->_view->render();


	}
and the view ROOT/themes/deafault/view/blog_view.php:
	<section>


	  <header>


	    <p>


	      Published on <time datetime="<?= $post['date_tag'] ?>" pubdate><?= $post['date'] ?></time> in


	      <? foreach($post['category'] as $c): ?>


	        <?= $c ?>


	      <? endforeach ?>


	    </p>


	    <hgroup>


	      <h1><?= $post['title'] ?></h1>


	      <? if($post['subtitle']): ?>


	        <h2><?= $post['subtitle'] ?></h2>


	      <? endif ?>


	    </hgroup>


	  </header>


	  <img width="200px" class="left" style="margin-right: 10px;margin-bottom: 10px;" src="<?= $post['image'] ?>" alt="post_image" />


	  <?= $post['text'] ?>


	  <div class="clear"></div>


	</section>
OK! That's all. Our simple weblog is ready and working. Now all the time saved from back office implementation can be used to style the front-end and get the most beautiful blog in the world ;)
Clearly this was only an example, and many features may be added, as the possibility to insert post comments, a view showing all the categories, a view showing all the posts related to one category, a strategy to handle errors like "page not found", a feed RSS and so on... Also it would be nice to treat the categories more like tags, but all these stuff go beyond the scope of this tutorial.